ELDERMOON SCHOOL OF HERBS & EARTH MEDICINE


Blog

  • ABOUT
    • MISSION & BIO
    • Crystal Clear HEALTH DISCLAIMER
    • Crystal Clear - WHO WE SUPPORT
  • PATREON/SUBSTACK + CONTACT
  • APOTHECARY
    • PDF - TINCTURE LIST
    • 8 Immortals Sichuan Chili Oil
  • LEARN
    • FAQ
    • MONTHLY HERBAL COUNCILs
    • 8 Mushroom Journeys
    • Mirco-Dose Self-Initiation PLANT DIETING >
      • Micro-Dose Plant Diets
      • LIBRARY: Micro-Dose Plant Diet Self Initiation
    • Birthing an Herbalist in 13 Moons On-line Plant Medicine Apprentice Journey >
      • Course Details for Birthing an Herbalist in 13 Moons
      • Course Outline
    • Private Herbal Classes
    • Walking the Herbal Path The Earth Medicine Way - Level I In-Person Herbal Apprentice
    • KIND WORDS
  • HEALTH SERVICES
    • Ask An Herbalist RN Questions
    • Herbal Consultations
    • Long Distance Earth Medicine Healing Sessions
  • BLOG
  • BLOG LIBRARY
  • Apothecary Videos
  • PHOTOS

1/13/2016

Soothing the fiery sore throat with Mama White Pine Cough Drops

0 Comments

Read Now
 
Picture

I have to say that when your throat is on fire, a good cough drop can save the moment! 

There is the issue of sugar when making these for we know too much sugar can suppress the immune system. We cannot live without glucose and our brains will actually seize up and die fast without it. I had to get okay with some quality sugary sweet products, seek quality sugars, and realize that it’s like water and the sun, too much will kill us. We still need them all, right? Sweetness is part of the chemistry of preserving the medicines we make and it just improves flavor for some situations. 

Here’s an easy recipe for honoring what White Pine can offer us when we have fiery throats, lots of mucus, and coughing from ailing lungs. Honey does not have the chemistry for this to work. I tried with poor results and hate cooking honey most of the time. I do have an old canning book that uses honey exclusively for making jams and they are delicious! Yes, you loose some of the benefits of raw honey but you never sacrifice flavor or health benefits.

So let's visit White Pine for a moment. Many forget to tun to this tree when we have colds and flus. White pine is usually right outside or near, depending on where you live, and you can simply pinch the tips with much gratitude for her greenery in the winter! This tree has a strong mothering kind of energy when we are sick and needing help. Making tea for drinking or pouring into the bath are ancient practices available to us for addressing infections and flus deep in our respiratory system and for keeping mucus fluid and flowing outward. This is the body's way of healing itself. Decongestants dry us out and will only compound the problem of making mucus too thick to move and then the bacteria have a perfect world to thrive in and secondary infections begin, such as bronchitis, sinus, or ear infections. Think rest and fluid, rest and fluid.

​I added Thyme to this for I had so much from the summer abundance! Thyme is a fantastic immune supportive herb, is a potent bronchodilator, meaning opens airway passages for better air movement, and has much to offer for antimicrobial strength too. Why do you think it made it into our food so long ago? It was for these very reasons when we were without refrigeration and still learning about germs, right? 

These are a hit in my house and they're pretty easy to make and delicious too. Bringing the outside in and remembering that winter does end, so enjoy the now, is good medicine this time of year. White Pine in the belly works for me!

Enjoy! xo-Jen

Mama White Pine, Lemon & Thyme Cough Drops

INGREDIENTS:
  • 2 cups White Pine & Thyme infusion or decoction – make it strong! I picked fresh White Pine tips and had dried Thyme from the summer.
  • 2 cups evaporated cane sugar, organic sugar, or Maple syrup crystals.
  • 2 teaspoon Organic Lemon Extract - The kind for baking found in health food stores. Peppermint extract is great too. High quality essential oils may be used, such as Eucalyptus but put only 5-7 drops per batch due to the potency of these oils.
  • Small silcone candy molds - see other other ideas below where you won't need these.
 
DIRECTIONS:
  1. Simmer with a tight lid the pine tips (2 big handfuls) and 3 cups of water for 15-20 minutes at barely a simmer. Keeping the lid on is so important or you lose all the essential oils, though your home will smell absolutely hypnotic! Alternately, pack 2 pint sized mason jars with the tips, fill with boiled water, cover, and leave overnight. I re-warm in the morning and strain
  2. Measure 2 cups infusion/decoction (Drink the rest or make a sacred bath for your bones to soak in!)
  3. Cook the infusion and the sugar you choose to the crack stage for making confections (300 degrees if you have a candy thermometer). The test without a thermometer is to drizzle some in cold water until it hardens quick. That’s the “crack stage”. Stir occasionally and watch closely. It took about 40 minutes and once you reach 250 degrees, it foams and shoots fast to 300 degrees. Stay close, stir, and turn off immediately once 300 degrees is reached. Use a pan with higher sides to be safe as the foam rises a bit.
  4. Stir in the Lemon extract. Pour into tiny silicone candy molds. Once cooled you can release them and store in a jar for sore throats and breathe freshening.
  5. Another way is to pour the finished candy into an 8x8 pan glass dish. Once cooled, tap out and break up to small, mouth sized pieces and store them in a glass jar.
  6. Or – test during the cooling in the pan, pinch off pieces when workable and roll into drops. Some people, skilled with candy chemistry, pour into drops once you reach the cooled stage that allows this. I always miss it so I roll them quickly using the hot water bath to keep them workable. 
Picture
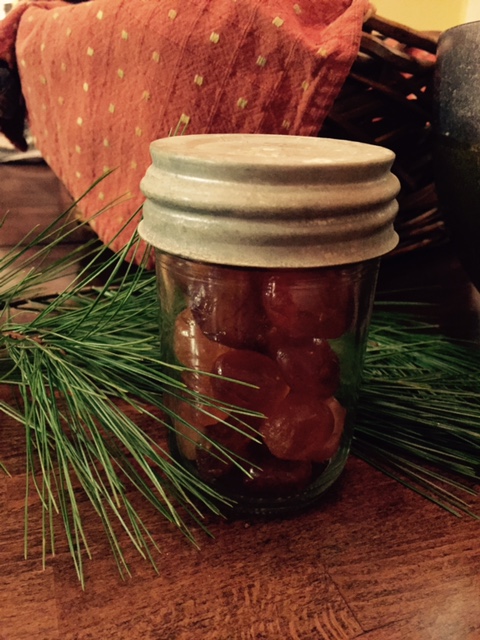
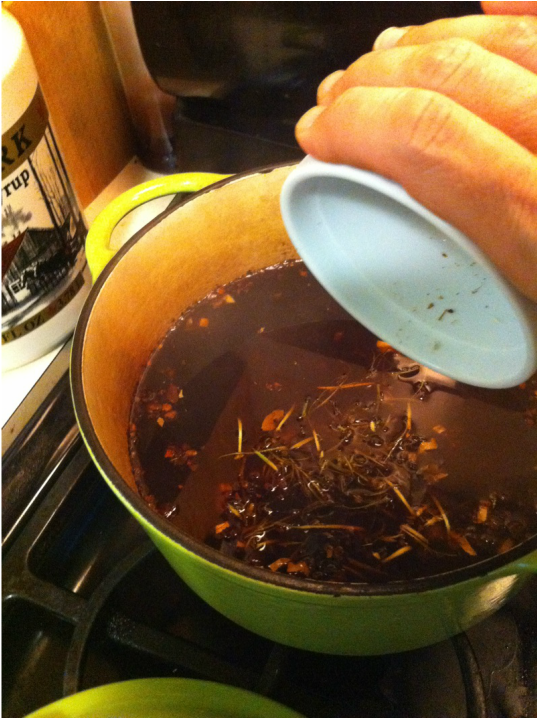
Simmering White Pine Tips with Thyme. Keep them densely packed during the 15-20 minute simmer to get a strong decoction. Keep the lid on too.
Picture
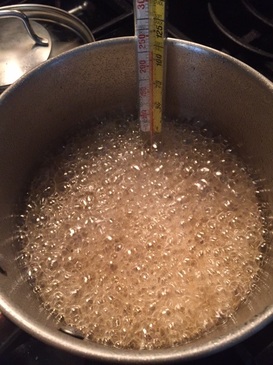
Add sugar and decoction together and cook to 300 degrees, which takes about 40 minutes. Watch closely for it shoots up fast once you reach 250 degrees.
Picture
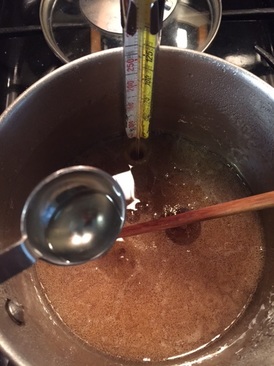
Cooked to cracked phase 300 degrees. Remove immediately from heat and stir in the Lemon Extract.
Picture
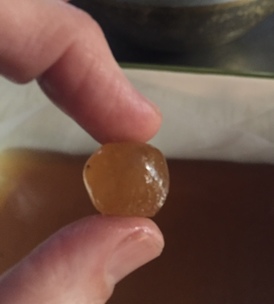
This batch was handrolled during the cooling-to-touchable phase. Plan to work quickly.
Picture
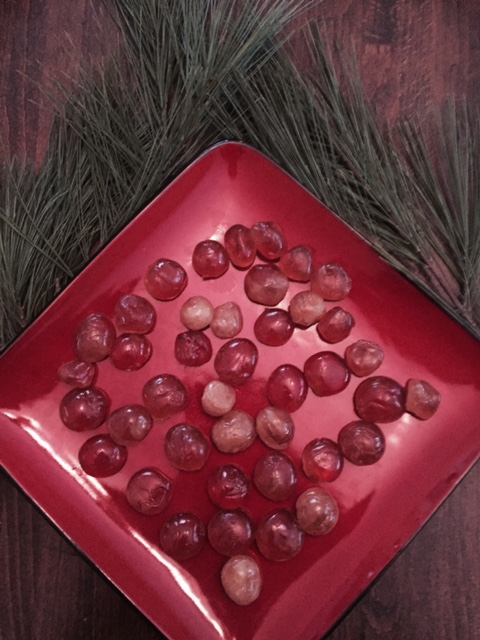
Finished and cooling White Pine Cough Drops. A big hit in my house! One batch fills two 12oz jars. Yes, mine are rolled larger than most cough drops and are rustic looking. Have fun!

ElderMoon School of Herbal Medicine and Earth Awareness

Deepen your knowledge of the Plants - on-line Herbal Classes

Share

0 Comments

11/22/2014

Teas, Infusions, Decoctions... What's the difference?

1 Comment

Read Now
 
Picture
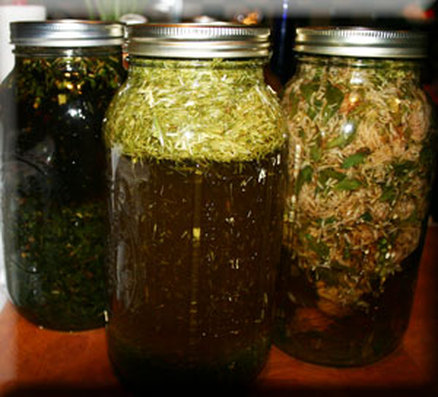
Elderberry Infusion
So let's refine your ability to understand the language within the herbal world. It is an easy first step and you'll be glad you're able to discern as you engage the healing art of this medicine world. I'm dedicated to making it clear about the different ways to prepare herbs, fresh or dried, with water so that you can take them into your body either orally, as compresses on your skin, in soaks and steams , or in the bath. It is our oldest, most effective, and most widely used form of herbal medicine.

"Herbal teas remain my favorite way of using herbs medicinally. The mere act of making tea and drinking it involves you in the healing process and, I suspect, awakens an innate ability for self-healing in the body. Though medicinal teas are generally not as potent as infusions, tinctures and other concentrated herbal remedies , they are the most effective medicines for chronic, long-term imbalances."  -Rosemary Gladstar


I completely agree and there is no way to say it better. The whole idea of drinking herbal teas is to bath your cells at regular intervals (ie. 3x/day) with the healing properties of the plant. What are the healing properties? Well, they include not only the medicinal, active strong properties, but also nourishing properties to build a particular system up (such as minerals, vitamins), and buffer properties to soften the harshness that could cause unpleasant side effects, and catalysts to direct and energize the healing to where you need help. Yes, nature provides, and in an incredibly elegant way with a multitude of forms! 

The making of herbal tea is a fine art we humans have enjoyed for thousands of years. It is also, thankfully, incredibly simple. Even if you have never cooked and have no desire, you can do this. All you need is a heat safe quart jar with a tight-fitting lid, the herb(s), and water that has reached the boiling point. Make sure it is a canning jar or reused pickle jar so it doesn't crack with the hot water.

Herbal teas can be drunk hot, at room temperature or iced. They’re delicious blended with a little fruit juice and frozen as pops for children who are sick.

After brewing the 5-10 minute usual time, herbal teas should be stored in the refrigerator. Left at room temperature for several hours, it will go “flat,” get tiny bubbles in it and begin to sour. Stored in the refrigerator, an herbal tea will be good for three to four days.

A cup of herbal tea is one thing. There is pleasure and healing with the 5-10 minutes soak of a tea bag or ball. However, medicinal teas or infusions by the cupful are very impractical and time consuming. What this translates to is one not making their herbal infusions correctly or often enough because it becomes time consuming. Then you stop taking what you need to take and the health issue you were working on deepens. Then your experience with herbal medicine is marred some. I do hear people say "it did nothing" and when we talk about what they actually did, it usually reveals some issues related to consistency and the strength of preparation. 

For larger quantities, make a quart of tea each morning or in the evening. The herb-to-water ratio varies depending on the quality of herbs used, whether they are fresh or dried and how strong you wish the finished tea to be. 

Picture
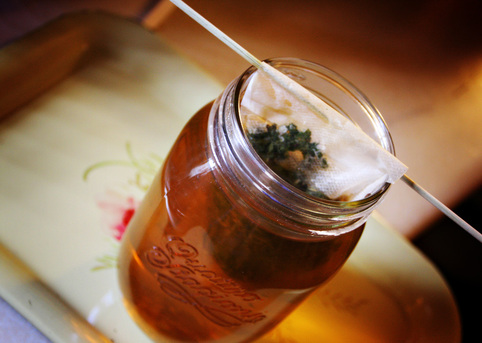
Red Raspberry Leaf steeped 5-10 minutes is tea and 1-4 hours is an infusion.


Herbal infusions as medicine.

Herbal infusions are made from the more delicate plant parts, including the leaves, flowers and aromatic parts or seeds. These fragile plant parts must be steeped rather than simmered because they give up their medicinal properties more easily than do the tougher roots and barks. To make an infusion, simply boil 1 quart of water per ounce of herb (or 1 cup of water to 1-3 tablespoon of herb). Pour water over the herb(s) and let steep for 30 to 60 minutes and up to 4 hour at least before drinking (more instructions below).  I often leave these overnight, capped, and wrapped with a towel on the counter. The brews are stronger and have an innate ability to withstand hours out of the refrigerator because of how potent they are. The proportion of water to herb and the required time to infuse varies, depending on the herb. Start out with the above proportions and then experiment. The more herb you use and the longer you let it steep, the stronger the brew. Let your taste buds and your senses guide you. We call these senses your "organoleptic" senses or your original senses that give you valuable information about a substance using your body like an antennae.  

Tools: To make an infusion, simply boil 1 quart of water per ounce of herb (or 1 cup of water to 1 tablespoon of herb). Pour water over the herb(s) and let steep for 30 to 60 minutes at least before drinking. I often leave these overnight capped and wrapped with a towel. The brews are stronger and have an innate ability to withstand hours out of the refrigerator because of their strength. The proportion of water to herb and the required time to infuse varies greatly, depending on the herb. Start out with the above proportions and then experiment. The more herb you use and the longer you let it steep, the stronger the brew. Let your taste buds and your senses guide you.

Ratio: I like to use 1 to 3 tablespoons of herb(s) for each cup of water, or 4 to 8 tablespoons of herb per quart of water, depending on the herb. So add your herb to the jar, pour your "just to the boil point" water in and cap.  I wrap a dish towel around the jar to keep the heat in. That's just my way and not necessary. I wait at least 30 minutes before I drink any. 

Use twice as much herb if your are using fresh plant material. Why? It' all about the water. Fresh plants still have their water in their cells and so take up more space than ones that are dried. That is why dried plants, without their water, can stand in a jar in a dark place and not rot. 

Heating: Place your dried herb in your jar and let it stand in the sink while you boil your water. So for a 1 quart jar I add a small handful which is about 4-12 Tb. If your infusion comes out so strong that it's hard for you to drink, that's fine and you're not the first to do this! I once made a high iron brew with a friend of mine as we were pregnant and anemic together in the early part of pregnancy. This is not uncommon as the body works hard to increase blood volume by 50% for baby! So our first sip was hysterical for we had such high expectations after all this hard work.... it tasted like someone had melted down a piece of the Brooklyn bridge! Totally metallic in taste... we both gasped and fell into hysterics. It did make total sense and yes, it was loaded with iron! We added more water and a bit of maple syrup to make is palatable at the drinking phase AND made notes on our recipe. This is how we all learn. By doing. By experiencing. I have a grand story too which is even better for remembering! 

So now, pour your boiled water into the jar with herbs and put the lid on. Or just leave in your pot on the stove if that is what you chose to use. 

Straining: General rules are wait 1 hour for aromatic seeds and flowers, up to four hours for mixed seeds, flowers and leaf material.  Then strain. It is fine to leave it longer but keeping the plants with the water at least this long gives you more of the medicine and nutrients we discussed.

Dose: For a medicinal tea to be effective, it must be administered in small amounts several times daily as stated above. For chronic problems, serve the tea three or four times daily. For acute ailments such as colds, fevers and headaches, take several small sips every 30 minutes until the symptoms subside. A serving is a good size mug for an adult or 6-8 fluid ounces. The dose is reduced or increased based on body size. 

Picture
Nettles, Oatsraw, Red Clover Infusions by the 1/2 gallon.


So let's think about it all. You have a plant that was full of water, growing, connected to the Earth. You know what part of the plant you need and what season to harvest it in because you have studied a little. So the next thing you do is cut it or dig it up and bring it inside to clean it up and ready it for drying. As it shrivels and wilts, that means the water is evaporating away and leaving the cells. We want this and the faster the better! Ideally you want your herbs to dry in days... not weeks. Taking more than a week  encourages mold growth and equals bad medicine. Drying is another topic for another time. 

So, you are quite successful drying your plants. You now have this dried plant material labeled and in jars in your dedicated herbal medicine cabinet. Do you have a dedicated medicine cabinet? You can. Make room for this world in your life by making room in the kitchen or in a small free standing cabinet or bookshelf draped creatively with curtains or gorgeous cloth to keep the light away. Light and heat degrade the plants ability to hold it's medicine for you, even when it's dried. It feels great to carve space in your world for this world. When I was in my earlier years, I moved to a new apartment and no one was allowed to have closet space in the common areas as they were dedicated to keeping the medicine safe. Sometimes clients or friends would just stand in my one walk-in closet because "I feel so much better after standing in there and just breathing".  

So now you have decided you need an infusion made. Once the dried herb and boiled water meet each other, you have several things happening. The cells that shriveled also received tiny cracks in their cell wall surfaces during the drying process. Inside these cracked cell walls, the medicine is held in the form of chemical compounds, and the nourishment is held in the form of vitamins and minerals, to keep it simple. So, when the heat contained by the water hits the cells in this dry, cracked state, they burst open and mobilize the healing properties you seek into the water. The proper amount of steeping time is necessary more for moving minerals out of the plant material that are so needed for deep tissue repair. Think of moving the minerals out of the plant material much the same as trying to get a rock out of a garden. It takes more time.  

Herbal Decoctions...

Picture
Unlike infusions, decoctions are boiled. Woody roots, non-aromatic seeds and barks are suited to this method. If you simply infuse roots and barks in hot water, as you do leaves and flowers, you will not extract the full medicinal properties of the herb. You will find some blends with mixed roots, barks, seeds, flowers and leaves. If you pour the blend in your hand, it should have these plant parts in varying sizes. For example, denser roots and barks will be in smaller pieces than the leaves and flowers. It takes time and experience to learn this part of herbal medicine crafting. For now learn the basics that give you a strong scaffolding to build on. There's a funny truth about plant people.... we always come around to the beginning and work with the simple ways. It is common to see a 30 year veteran herbalist boiling a decoction of one plant to use for days. 


Tools: You will need a non-reactive, heavy saucepan. I use an enamel pot. Acupuncturists prefer you use glass instead of metal and I lean this way too most of the time.  It is the perfect size for me, as I normally make decoctions 2-3 cups/500-750 ml at a time.

Ratio: Amounts can vary, depending upon your taste and the potency of the herbs. A general rule is 1 to 2 teaspoons of herb mixture to each cup of water is a good starting point. Roots and barks are more concentrated than the lighter leaves and flowers used in infusions, so less is needed. The density granted these plant parts helps increase their medicine holding per square inch... if there is such a measurement!

Heating: Start with cold water over a low heat and slowly bring herb mixture to a simmering boil. It is important to bring the herbs and water up to boiling together. Throwing herbs into boiling water destroys some desired properties. Keep the pot covered and simmer for ten to 20 minutes. Take off heat and leave covered while your decoction cools to drinking temperature.

Straining: I often let the mixture set all day or overnight without straining. I will sometimes wrap a kitchen towel around it to keep the heat in a bit more too but this is not a must. The heavy roots and barks settle to the bottom, and you can pour off the top. 

Overnight Method: Use this method when the material you want to extract is a bitter, or mineral salt. The whole herb, roots or seeds, or the bark of a woody plant are soaked in cold water for several hours to over night.  Then this is brought to a boil and simmered for 30 minutes, cooled a bit covered, and strained.

Double Decoctions....

For a good description on this, please see my Root Beer Syrup recipe. Double decocted herbs are often used to concentrate a remedy so that smaller quantities are needed per dose and it also increases shelf life your medicines. They taste pretty intense and are not what I call enjoyable for the most part. I say they are best done as shot in one gulp! Syrups are another option which provide lower quantity in dosing, increases shelf life, AND they can taste lovely or at least slightly palatable. I have found that those raised in the USA tend to be much more concerned about taste and it is the least thing considered when it comes to medicine making from a global perspective. None the less, flavor is fun to play with. 

I do hope this has helped you understand our oldest for of medicine - water based preparations. Be sure to send any questions along. Be Well, Jen 

Share

1 Comment
Details

    Jennifer Costa, Herbalist-RN, Teacher, Botanist BS, EM-CST, and Founder of ElderMoon School of Herbs & Earth Medicine

    Categories

    All
    Classes
    Decoctions
    Food As Medicine
    Healing Broths
    Herbal Vinegars
    Herbal-vinegars
    Holidays And Festivals
    Infusions
    Medicine Making
    Plant Profiles
    SCIENCE!
    Skin Care
    Syrups
    Teas
    Tinctures

    RSS Feed

    Archives

    February 2025
    January 2025
    November 2024
    October 2024
    May 2024
    January 2023
    September 2020
    February 2020
    September 2019
    April 2019
    January 2019
    July 2018
    June 2018
    May 2018
    April 2018
    March 2018
    February 2018
    January 2018
    December 2017
    November 2017
    August 2017
    July 2017
    April 2017
    March 2017
    January 2017
    December 2016
    November 2016
    October 2016
    September 2016
    August 2016
    July 2016
    June 2016
    April 2016
    March 2016
    January 2016
    December 2015
    November 2015
    October 2015
    August 2015
    July 2015
    May 2015
    March 2015
    January 2015
    December 2014
    November 2014
    October 2014
    September 2014

Proudly powered by Weebly
Photos from montillon.a, BinaryApe, Editor B, arripay, MozzingtonDC, TintedLens-Photo (on&off), Wendell Smith, Muffet, Laika ac, Wendell Smith, Editor B, Allie_Caulfield, marco monetti, scarlet.keiller, Steve Slater (used to be Wildlife Encounters), Joanna Lee Osborn, Frank Lindecke, Whenleavesfall, syuu1228, montillon.a, Prestonbot, Forest Farming, Editor B, Buster&Bubby, Rob.Bertholf, I, DL., KrisCamealy, Nicholas_T, Peter Ealey, Wendell Smith, Infomastern, jonanamary, Björn S..., Rev Stan, tillwe, Ben124., Michele Dorsey Walfred, young@art, wackybadger, Tambako the Jaguar, freezr, Rob.Bertholf, pixelshoot, Deanster1983 who's mostly off, Magnus Norden, blumenbiene, will668, Tobyotter, tristanloper, Amy Loves Yah, benmacaskill
  • ABOUT
    • MISSION & BIO
    • Crystal Clear HEALTH DISCLAIMER
    • Crystal Clear - WHO WE SUPPORT
  • PATREON/SUBSTACK + CONTACT
  • APOTHECARY
    • PDF - TINCTURE LIST
    • 8 Immortals Sichuan Chili Oil
  • LEARN
    • FAQ
    • MONTHLY HERBAL COUNCILs
    • 8 Mushroom Journeys
    • Mirco-Dose Self-Initiation PLANT DIETING >
      • Micro-Dose Plant Diets
      • LIBRARY: Micro-Dose Plant Diet Self Initiation
    • Birthing an Herbalist in 13 Moons On-line Plant Medicine Apprentice Journey >
      • Course Details for Birthing an Herbalist in 13 Moons
      • Course Outline
    • Private Herbal Classes
    • Walking the Herbal Path The Earth Medicine Way - Level I In-Person Herbal Apprentice
    • KIND WORDS
  • HEALTH SERVICES
    • Ask An Herbalist RN Questions
    • Herbal Consultations
    • Long Distance Earth Medicine Healing Sessions
  • BLOG
  • BLOG LIBRARY
  • Apothecary Videos
  • PHOTOS